This is simple bash script which query skype username against http://resolveme.org/ and grab I.P.
wget https://raw2.github.com/niravkdesai/skypersolver.sh/master/skypersolver.sh
sh skypersolver.sh

skype resover bash script
Script which contain first step of pentesting.
This is simple bash script which query skype username against http://resolveme.org/ and grab I.P.
wget https://raw2.github.com/niravkdesai/skypersolver.sh/master/skypersolver.sh
sh skypersolver.sh
skype resover bash script
For checking http header for security perspective you can visit Security Headers . It will check for following header.
Access Control Allow Origin
Content Security Policy
Cross Domain Meta Policy
NoSniff
Server Information
Strict Transport Security
UTF-8 Character Encoding
X-Frame-Options
X-Powered-By
X-XSS-Protection
I wrote bash script which check HTTP header of website against securityheaders.com & give output.
git clone https://github.com/niravkdesai/securityheaders.git
chmod +x header.sh
./header.sh

HTTP-Header
Troyhunt start great website for checking your email address has been compromised in data breach or not.Right now Adobe,Stratfor,Gawker,Pixel Federation,Yahoo!,Sony,Vodafone `s breach email address is listed. You can check it manually on their site.
I wrote simple bash script for checking against their site that email address has been compromised or not.You can also write in python using simple requests module.

python-havebeenpwned

have-i-been-pwned bash script
Usage:-
git clone https://github.com/niravkdesai/haveibeenpwned.git
cd haveibeenpwned
chmod +x haveibeenpwned.sh
./haveibeenpwned.sh
Please enter email address to check against http://haveibeenpwned.com
troyhunt%40hotmail.com
You have been pwned in [“Adobe”] breach
Truecaller is a global phone directory application for smartphones and feature phones, and accessible via a Web site. If you have any unknown mobile number you can search in truecaller website or using truecaller application.This python script is written by A’mmer Almadani. Script is still in developing phase.More functions will be added soon.
git clone https://github.com/Logic-gate/callerpy.git
cd callerpy
Now open caller.py file & enter your twitter credential in line 39,40. it will use for authentication.
python caller.py -h
usage: callerpy.py [-h] -n number [-c country] [-cc country code] -l login
TrueCaller Name Retriever
optional arguments:
-h, –help show this help message and exit
-n number, –number number
Phone Number Without Country Code (default: None)
-c country, –country country
Country | String (default: None)
-cc country code, –countrycode country code
Country | Int (default: None)
-l login, –login login
Login Method | twitter, g+, fb (default: twitter)
python callerpy.py -n 9016986989 -c india-other -l twitter

Truecaller Name Retriever Python Script
Gravatar is a service for providing globally unique avatars.When the user posts a comment on such a blog that requires an e-mail address, the blogging software checks whether that e-mail address has an associated avatar at Gravatar. If so, the Gravatar is shown along with the comment.Script is made by averagesecurityguy . Our script take email address & check against gravatar database , if email address is exist , then extract username , location, account detail.First we will understand how it`s work , for developer resources click here.
To view details of email address ; we need to create email hash of address. For example , if you want to check email address nirav.desai1991@gmail.com. We have to create md5 hash of email address.
root@bt:~#echo -n nirav.desai1991@gmail.com| md5sum
dfd36ad92895ea6b7829d2918ad07fcf
To extract details about email address we have to make following request
http://en.gravatar.com/dfd36ad92895ea6b7829d2918ad07fcf.json
And there we can get details about my gravatar profile.
It`s just simple details how it`s work. Now we will go to script, Gravatar.py takes a file with a list of email address, one on each line, and searches Gravatar for information about the email address. If address is registered with Gravatar, then selected data points are extracted from the Gravatar profile.
wget https://raw.github.com/averagesecurityguy/scripts/master/gravatar.py
Now you need email address list file .
python gravatar.py email
gravatar email address search
During social engineering test we need to extract email address from given domain; so we can send them phishing message ;tab nabbing link ;click jacking or iframe which contain link of metasploit exploitation.Today we learn script which extract email address from given domain.This is simple Bash script which visit every web-page of website & then collect email address.
Don`t use for website which has lots of web page because then it has to crawl every page so it will be slow.Speed of script depends on loading speed of website & number of pages.I know it can be enhanced ; if you find any solution regarding to speed than you can comment here.
Download & usage instruction are at bottom of article.
#!/usr/bin/env bash
#E-Harvester is simple script to harvest email address for penetration testing.
#Script is working in two mode
#In first mode you have to create sitemap manually. You can use (http://www.xml-sitemaps.com/) to create sitemap.
#and put sitemap text file in working directory of E-HARVESTING.Give name it to urllist.txt
#Second mode is automatic just specify domain name & it will first crawl website ;then harvest email address ;But it`s slow due to crawling process.
echo ”
_____ _ _ _ ______ _______ ____ _____ _____ ____
| ____| | | | | / \ | _ \ \ / / ____/ ___|_ _| ____| _ \
| _| _____ | ![]() | / _ \ | |_) \ \ / /| _| \___ \ | | | _| | |_) |
| / _ \ | |_) \ \ / /| _| \___ \ | | | _| | |_) |
| |___ |_____| | _ |/ ___ \| _ < \ V / | |___ ___) || | | |___| _ <
|_____| ![]() |_/_/ \_\_| \_\ \_/ |_____|____/
|_/_/ \_\_| \_\ \_/ |_____|____/ ![]() |_____|_| \_\
|_____|_| \_\
”
echo “Please choose method”
echo ”
1. If you have sitemap of website than make name urllist.txt & Put in same directory(work Fast)
2. Generate sitemap than harvest email(Automatic but slow)
”
read m1
if [ “$m1” = “1” ];then
echo ”
Script is workng,Please be Patient & give some time to harvest it.
”
cat urllist.txt | while read f1
do
w3m $f1 >> f1
perl -wne’while(/[\w\.]+@[\w\.]+/g){print “$&\n”}’ f1 | sort -u >> output.txt
rm f1
done
cat output.txt
echo ”
Harvesting is complete.Open output.txt file to view email address.
”
fi
if [ “$m1” = “2” ];then
echo ”
Please Enter Website To Harvest Email Address
For example http://tipstrickshack.blogspot.com
”
read choice
echo ”
Now we have to make urllist of website.So be Patient & give some time to harvest it.
”
wget –spider –recursive –no-verbose –output-file=wgetlog.txt “$choice”
sed -n “s@.\+ URL:\([^ ]\+\) .\+@\1@p” wgetlog.txt | sed “s@&@\&@” > urllist.txt
rm wgetlog.txt
cat urllist.txt | while read f1
do
w3m $f1 >> f1
perl -wne’while(/[\w\.]+@[\w\.]+/g){print “$&\n”}’ f1 | sort -u >> output.txt
rm f1
done
cat output.txt
echo ”
Harvesting is complete. Open output.txt file to view email address.
”
echo ”
Use E-sender to send email to harvested email Address
”
fi
Script work on two mode. In first mode you have to specify sitemap of website ,it is fast.Just visit this URL http://www.xml-sitemaps.com/ & make sitemap of victim website ;download text file of urllist.txt & put it in same directory of script.Now it crawl one by one url from urllist.txt & collect email address.
Second mode is automatic ; just supply domain name ; it make sitemap & then gather email address.But it is slow .

harvesting-email
How to Download & use?
git clone https://github.com/niravkdesai/ehs.git
cd ehs
chmod +x *
./eharvester.sh
This python script extract all images from given url & then stored it to local hard drive ;where you can extract metadata & can gather information about victim.Before you have to install BeautifulSoup
third party module.
#!/usr/bin/python
from BeautifulSoup import BeautifulSoup
import os
import optparse
def mirrorImages(url, dir):
html = ab.open(url)
soup = BeautifulSoup(html)
image_tags = soup.findAll(‘img’)
for image in image_tags:
filename = image[‘src’].lstrip(‘http://’)
filename = os.path.join(dir,\
filename.replace(‘/’, ‘_’))
print ‘[+] Saving ‘ + str(filename)
data = ab.open(image[‘src’]).read()
ab.back()
save = open(filename, ‘wb’)
save.write(data)
save.close()
def main():
parser = optparse.OptionParser(‘usage %prog ‘+\
‘-u -d ‘)
parser.add_option(‘-u’, dest=’tgtURL’, type=’string’,\
help=’specify target url’)
parser.add_option(‘-d’, dest=’dir’, type=’string’,\
help=’specify destination directory’)
(options, args) = parser.parse_args()
url = options.tgtURL
dir = options.dir
if url == None or dir == None:
print parser.usage
exit(0)
else:
try:
mirrorImages(url, dir)
except Exception, e:
print ‘[-] Error Mirroring Images.’
print ‘[-] ‘ + str(e)
if __name__ == ‘__main__’:
main()
Usage:-
chmod +x script_name
./script_name -u url -d directory to save images.
Metadata is stored in any document by authoring application which can be user-name ; comment ;creation date;modification date. Today we will learn python script to extract metadata from pdf file.
But before that you have to install pypdf python module . For that open terminal & type
pip install pypdf
Pypdf is offers ability to extract document information, split ,merge,crop,encrypt and decrypt documents.
import pyPdf
import optparse
from pyPdf import PdfFileReader
def printMeta(fileName):
pdfFile = PdfFileReader(file(fileName, ‘rb’))
docInfo = pdfFile.getDocumentInfo()
print ‘[*] PDF MetaData For: ‘ + str(fileName)
for metaItem in docInfo:
print ‘[+] ‘ + metaItem + ‘:’ + docInfo[metaItem]
def main():
parser = optparse.OptionParser(‘usage %prog “+\
“-F ‘)
parser.add_option(‘-F’, dest=’fileName’, type=’string’,\
help=’specify PDF file name’)
(options, args) = parser.parse_args()
fileName = options.fileName
if fileName == None:
print parser.usage
exit(0)
else:
printMeta(fileName)
if __name__ == ‘__main__’:
main()
first we import pypdf module ;then optprase module. There is two function available.
(1)main
(2)printMeta
(1)main :-
First some lines are indicated usage message for user & specify argument to supply filename. Whatever file name is supplied by user is saved to fileName variable ;if the file does not exist then it print usage message & stop execution of script.
If file is exist & we supply correct argument then it call second function printMeta.
(2)printMeta(fileName):
pdfFile = PdfFileReader(file(fileName, ‘rb’)) :- read pdf file & saved it to pdfFile .
docInfo = pdfFile.getDocumentInfo() :- Get document info from pdf file & saved it to docinfo.
print ‘[*] PDF MetaData For: ‘ + str(fileName) :- It print [*] PDF MetaData For: filename.
for metaItem in docInfo:
print ‘[+] ‘ + metaItem + ‘:’ + docInfo[metaItem]
above part print every metadata one by one which is extracted from document & saved to docinfo.

python-pdf
Usage of script:-
chmod +x script_name
./script_name -F filename.pdf
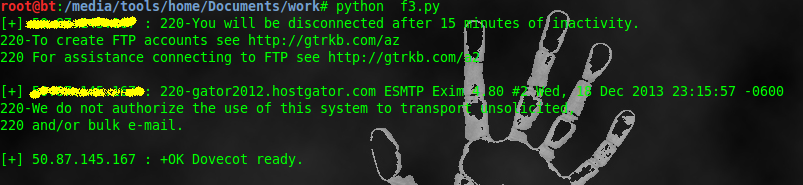
This is simple banner grabbing python script which can grab service banner of ports 21,22,25,80,110,443. If you want to grab banner of different ports ;you can modified it as per your requirement.
#!/usr/bin/python
import socket
def retBanner(ip, port):
try:
socket.setdefaulttimeout(2)
s = socket.socket()
s.connect((ip, port))
banner = s.recv(1024)
return banner
except:
return
def main():
portList = [21,22,25,80,110,443]
for x in range(147, 150):
ip = ‘192.168.95.’ + str(x)
for port in portList:
banner = retBanner(ip, port)
if banner:
print ‘[+] ‘ + ip + ‘ : ‘ + banner
if __name__ == ‘__main__’:
main()
First we import socket library to script. Then we defined two function (1)retBanner (2)main
(1)retBanner:-
socket.setdefaulttimeout(2) indicate that default timeout of socket is 2 second.
s = socket.socket() indicate that we open socket.
s.connect((ip, port)) indicate that connect socket to specific i.p. and specific port.
s.recv(1024) read next 1024 bytes of socket & save it value to variable banner.
(2)main:-
portList = [21,22,25,80,110,443] :- grabbing banner of these ports.If you want to grab more port just add port number in portList array.
for x in range(147, 150): :- It is used for grab banner of block of i.p. It only change fourth octet of i.p. address. Change value according to your requirement.
ip = ‘192.168.95.’ + str(x) :- we defined first three octet of i.p. ;& fourth octet is come from for loop.
for port in portList: :- Scan one by one port from array portList.
banner = retBanner(ip, port) : we called first function retBanner & saved it value to variable banner.
And last two line indicate that if we got banner than print on screen with i.p. : banner.
(3)if __name__ == ‘__main__’: It indicate that hat our Python files can act as either reusable modules, or as standalone programs.
And last line of calling of main function.
python_banner_grabbing
Usage of script
chmod +x script_name
python script_name
Here is the code for a simple port scanner constructed with bash. The script takes three arguments: a host name or I.P. address, the port at which we wish to start our scans, and the port at which we wish to stop our scans.But before this you have to add /dev/tcp/ support to bash.
#!/bin/bash
#populate our variables from the arguments
host=$1
startport=$2
stopport=$3
#function pingcheck ping a device to see if it is up
function pingcheck
{
ping=`ping -c 1 -w 10 $host | grep bytes | wc -l`
if [ “$ping” -gt 1 ];then
echo “$host is up”;
else
echo “$host is down quitting”;
exit
fi
}
#function portcheck test a port to see if it is open
function portcheck
{
for ((counter=$startport; counter<=$stopport; counter++))
do
(echo >/dev/tcp/$host/$counter) > /dev/null 2>&1 && echo “$counter open”
done
}
#run our functions
pingcheck
portcheck
We can divide this script in three parts.
(1)In first part we populate variable for argument ;variable $0 is reserved for script name . ./scriptname host startport stopport
So host value saved in variable 1 ;start port value is saved in variable 2 & stop port value is saved in variable 3.
(2)Second part is ping check function.
We defined ping check function to determine host is up or not. Here we use pipe for giving previous command output to next command.
ping -c 1 -w 10 $host | grep bytes | wc -l
-c 1 is indicated that we only transmitted 1 packet .
-w 10 is indicated timeout value is 10 seconds.
If host is up then we got some response like
PING 127.0.0.1 (127.0.0.1) 56(84) bytes of data.
64 bytes from 127.0.0.1: icmp_seq=1 ttl=64 time=0.056 ms
— 127.0.0.1 ping statistics —
1 packets transmitted, 1 received, 0% packet loss, time 0ms
rtt min/avg/max/mdev = 0.056/0.056/0.056/0.000 ms
Now this output is redirected to input of next command which is grep bytes ,it used for searching ; so it will only take line which has bytes so out put of that is
64 bytes from 127.0.0.1: icmp_seq=1 ttl=64 time=0.056 ms
Next this is applied to wc -l which is used for counting line ; so output is one because we have only one line output of previous command.
So final value is 1 ;this value is stored into the variable name ping
Now we used simple if statement which check value in ping variable i value is greater than 1 than host is up otherwise down because if host is down than we don`t get response which contain bytes so no grep output & hence line is zero & value in variable ping is also zero.
(3)Third part is port scanning function
First is for loop ;it will running for start port to stop port which we have to specified in argument while running of script.So if we specified start port =80 ;stop port =85 then for loop will run from 80 to 85 to check open port.
Next is (echo >/dev/tcp/$host/$counter) > /dev/null 2>&1 && echo “$counter open”
Here we are redirect output of /dev/tcp/$host/$counter (Which actually check port is open or not) to /dev/null(Which is null file).2>&1 is used to display error message.And final output is display on screen.
And in last two line we called function which we defined in part 2 & part 3.
Usage of script:
chmod +x script_name.sh
./script_name host start_port stop_port
We can also scan multiple I.P. by reading I.P. from file.
